Monday, February 27, 2006

chickpeas with tomatoes and potatoes


dead simple. dead delicious. this recipe from deborah madison opened my eyes to the wonders of corriander. so much so that i frequently double or triple the amount. i am given to bouts of enthusiastic excess.

this recipe is best if you cook the chickpeas yourself in a little salted water, the broth of which is recycled back into the dish. i usually also omit the oil as the dish is plenty succulent without it.

serve over couscous, either the little grain type or the larger pellet sized israeli type.

chickpeas with potatoes and tomatoes
1/3 cup olive oil
1 large onion
3 waxy potatoes, diced into chickpea-sized cubes
2 carrots, cut into 1/2" rounds
1 small dried red chili (i've used a bit of chipotle chili with good results)
2 large cloves garlic (4 if you're a garlic freak), mashed with 1 teaspoon ground corriander
1 cup peeled and diced tomatoes (canned please if it's not tomato season!)
3 cups chickpeas or 2 15 oz. cans, rinsed
1/2 cup water or chickpea cooking broth
1/4 cup chopped cilantro
1/2 cup chopped parsley

heat oil and cook onion until lightly colored, five to eight minutes. you can omit the oil in this recipe altogether and steam fry the onions in a little water, adding more as needed to prevent burning. add garlic and cook a few minutes more. add tomatoes and cooked chickpeas. season with 1 teaspoon salt and freshly ground pepper. add water or chickpea cooking broth. cover and simmer gently until potatoes are cooked through. season and stir in parsley and cilantro.

Tuesday, February 21, 2006

homemade amazake


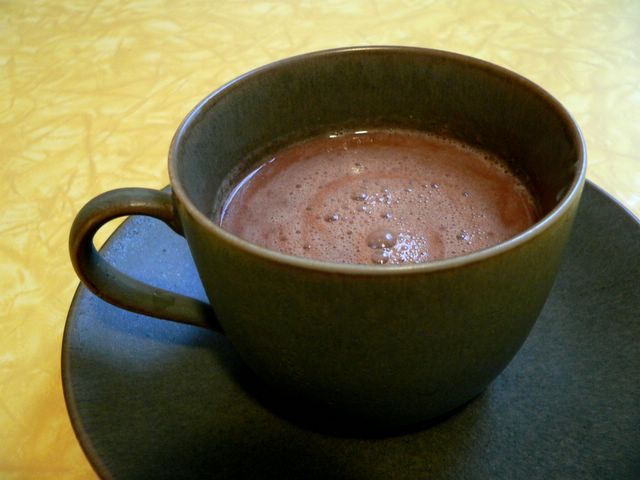
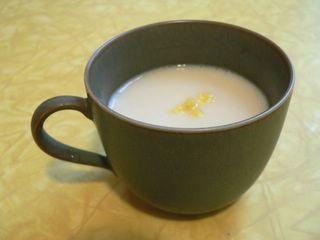
traditional japanese hot amazake drink with a pinch of fresh grated ginger

amazake is sneaking it's way into the american culinary consciousness. you may have seen little bottles of the stuff lurking in the refrigerated section of your local health food store, all cozied up next to the spirulina and camel dung health drinks. you know what i'm talking about, those little shakes that use amazake as a base along with nuts, fruits and various flavorings. they're thick, creamy, sweet and, of course, expensive.

for the uninitiated, amazake is nothing more than cooked grain (white or brown rice being the most common but other grains can also be used) innoculated with aspergillus oryzae in the form of koji and allowed to ferment for anywhere from 12-24 hours. the aspergillus breaks down the grain's carbohydrates into simple, unrefined sugars. the end result is a thick, sweet porridge with a very distinctive flavor. if it tastes a bit like sake to you, you are not mistaken. this is the first step in making sake (and miso and shoyu and shochu too). ama means sweet, and zake (the z is just a spelling change) stands for sake, for which we need no translation. despite this slight taste resemblance to sake, amazake is not alcoholic.


coco amazake
during the winter months in japan amazake is drunk steaming hot, diluted with water and seasoned with fresh grated ginger. i like my amazake served in this manner, but you could add other seasonings like cinnamon, nutmeg and ginger and have a sort of non-egg nog grog. or you could mix with cocoa powder and have a naturally sweetened hot chocolate drink. on the cooler end of the spectrum, you could use it to as a sweetening agent for shakes and smoothies. it is said that amazake has certain leavening powers and can be used in baking.

so, if you're into fermenting and culturing, like i am, or if you like to drink amazake but don't like to pay the big price tag, homemade might be the way to go. the process is really quite simple. first you will need the following items:
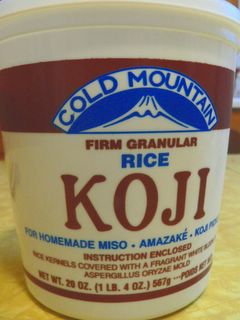

koji

koji
rice or other grain
thermometer
incubator
vessel

koji can be found in most japanese markets or online. it is nothing more than rice grains that have already been innoculated with the aspergillus. i buy it pre-prepared in the tubs pictured above. if, however, if you would like to try to make koji at home (which requires rice, the aspergillus spores plus another long fermentation), you can order the spores from gem cultures. i buy my koji premade since it saves so much time.


in the incubator
next comes the most difficult part of the process...jerry-rigging an incubator to suit you needs. for my homemade tempeh i just use my gas oven. the pilot light keeps the tempeh at about the right temperature. amazake however should be incubated at a slightly higher temperature (130 - 140f; 55-60c).

two incubator set-ups have worked for me: 1. the oven method: in my gas oven i place a cheap-y desk lamp with a 60 watt bulb, plug it in and close the door. in my oven this keeps the temperature at around 130 degrees and the amazake is done in approximately 12 hours; 2. the heating pad method: this is how my mom does it, and it takes a little longer but is less hassle. just wrap your rice and koji filled vessel in a towel and wrap inside an electric blanket or heating pad. the temperature setting to keep your blanket on will vary. on high, my little heating pad runs at about 120 degrees and the amazake is done in 22 hours.

now that we have the basics in order, let's get fermentin!

1 cup white rice, brown rice or other grain (millet, etc.), washed and drained
2 3/4 cups water
2 cups koji

1. cook rinsed rice in water at a low simmer for 30 minutes for white rice, 50 minutes for brown rice, or use a rice cooker if you have one. due to the water:grain ratio, the rice should be slightly porridge-like.

2. cool to about 140 degress farenhite (60 degrees celcius) and add koji. i use a thermometer to test the temperature but you can test with your finger - it should be just cool enough that your digit can tolerate the heat and not immediately blister but not so cool that it can linger. maybe like a really hot bath. thoroughly combine the rice and koji and place in a crock, glass jar or pyrex baking dish and cover.

3. incubate at 130 - 140 f (55 - 60 c) for 10-14 hours. if you can't get the incubator hot enough, process for an additional 5 - 10 hours until the rice is very sweet and the grains are very soft.

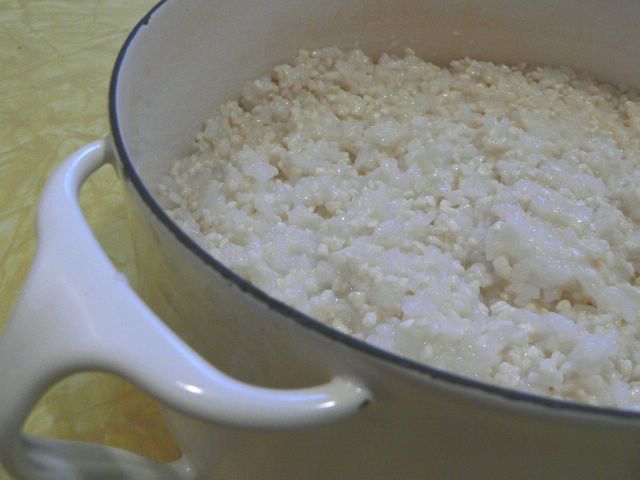
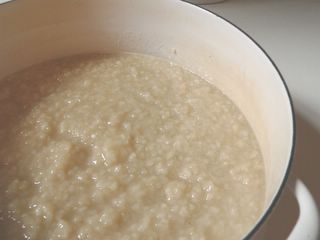
before incubating and after 22 hours at about 120 farenhite

4. when the rice is meltingly soft and very sweet, place in a covered saucepan and simmer for 10 minutes to stop the fermentation. be very careful not to burn it like i did my first time. after cooking, you may place amazake in a blender and puree until all rice grains are incorporated and the amazake resembles a thick pudding, or leave it as is. this is your base and you can use it thinned out to make the traditional japanese drink, dilute with water, nuts and seasonings to make a shake, or use it in baking as a honey substitute.

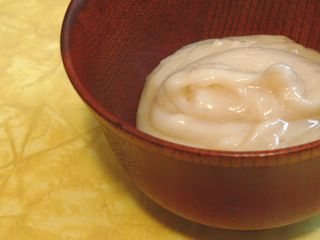
pureed amazake, undiluted

for more information on amazke, you can follow these links:
cybermacro has a nice little write up of the amazake making process and also sells koji online
gem cultures the great-grandaddy of all things fermentable, you can buy just about any kind of starter here, from keffir to tempeh to aspergillus to timbuktu.
dom's culture pages. he's a fermenting fool and has some nice write ups about a variety of fermentables.

Thursday, February 16, 2006

bagel dogs


the other day my man and i were walking down the street when we spied, plastered on a bus kiosk, a poster of this gigantic, cylindrical, flesh-colored thing encased in a tan-ish dough-y blanket and dotted with little black and tan specks.

"yum," we whimpered and leered simultaneously, "bagel dog".

so we turned right around and went home. and i made some. using my trusty old bagel recipe. my dogs were fake. his dogs were real. both dogs were good. that's the power of advertising for you.

bagel dough
1/2 cup warm water
1/2 Tablespoon sugar
1 ½ teaspoon yeast
3/4 teaspoon salt
1 1/2 cups flour

place yeast in warm sugar water and let froth. add flour and salt and knead until smooth and shiny. depending on your type of flour and altitude, you may have to add a little more or less water (i added a little more). let the dough rest at least 20 minutes...poor old dough, after all that stretching and beating it needs to relax a little! then, lightly flour a surface and, depending on the size of your dogs, divide the dough into either four or eight segments. eight for those skinny little faux dogs, four for those elephantine neiman ranch fearless franks. with your hands, roll each segment into a rope shape that is about twice as long as your dog. place the snake on your floured surface and, using a rolling pin, roll width-wise so you get a flat, rectangular shape. place the dog at one end of the rolled dough at a 45 degree angle and coil up to the top of the dog, making sure the dough overlaps a bit to completely cover the dog. repeat with remaining dogs. place on a well greased (or floured) cookie sheet and let rest another 20 minutes. at this point you should bring to boil at least 4 inches of water in a large pot with 1-2 T. sugar. after 20 minutes place the bagel dogs in rapidly boiling water for 30 seconds to 1 minute on each side. the heat of the water is very important since this is what will make the dough puff up and get chewy. place a lid on the pot once the bagels are in the water to maintain a high temperature. drain and place on well greased, light colored cookie sheet and sprinkle with the toppings of your choice (i like salt, dried garlic bits, sesame seeds and fresh black pepper) or leave them plain. bake at 450 for about 15-20 minutes. serve with ketchup and homemade mustard.

Monday, February 13, 2006

homemade lara type bars


these things seem to be all the rage right now - they're the latest "nutrition" or "sports" bar but with an un-processed, all-natural, all-raw, "healthy" twist. after checking out the ingredients online it seemed to me that they were nothing more than a new take on that old seventies classic, the dreaded date roll.

out of curiosity i picked one up at trader joes the other day for a buck something and gave it a nibble. i was expecting something overly sweet yet bland. i was disappointed. it was good. too good really. if you read the nutrition information, one bar has about 220 calories, which is a lot of calories and more like a light meal than a snack. but they are handy for when you do need something to eat and there's nothing to be had and you're starting to get that headache that signals the imminent onset of extreme, pms-mimicing grouchiness. i'm keeping one in my car. next time i travel i'll pack a few along. if you're a bike rider or long-distance runner or something like that, they could come in handy. these also could be a good all-natural snack for kids. the recipe that follows is my approximation of the base. add whatever suits your fancy. the quantities are for one bar only, so be sure to multiply to get your desired amount.

homemade lara-type bars
makes 1 bar
1 Tablespoon dates, pureed
3 Tablespoons dry ingredients (nuts, dried fruits, coconut, oats, etc.)

pit dates and whir in a food processor or mash by hand until they're one sticky mass. this will be the base, the "glue" that will hold it all together. to this base, add about 3 Tablespoons of finely diced dried ingredients - the nuts of your choice (almonds, cashews, pecans, hazlenut, etc.), dried fruit, oats, spices, etc. with your hands mix it all together and form into a tight ball. roll this ball into a rope and then pat it flat into a rectangle. tightly wrap in plastic wrap (the wrapping will help the bar hold it's shape as you further mold it) and apply pressure to the top using a flat surface - a cutting board works well. to shape the sides you can take two knives and apply pressure to opposite ends of the bars. refrigerate wrapped. for larger batches shape into a larger square, chill and cut into desired bar shapes with a very sharp knife.

some tasty combinations:
cashew: 1 Tablespoon dates + 3 Tablespoons cashews
almond coconut: 1 Tablespoon dates +2 Tablespoons almonds + 1 Tablespoon unsweetened coconut
almond spice: 1 Tablespoon dates + 3 Tablespoons almonds + 1/4 teaspoon each: cinnamon & nutmeg + 1/8 teaspoon ground ginger.
cranberry coconut: 2 Tablespoons minced dried cranberries, 1 Tablespoon unsweetened coconut

Friday, February 10, 2006

weekend cat blogging #36: cat attack


he may be an old boy but he still has some chops left in him...

and on a cat-related note, here is a video of some of those crazy things our not always dignified furry friends get up to.

Monday, February 06, 2006

hijiki with carrots


recently i've been cooking a lot from deborah madison's vegetarian cooking for everyone . i've had this book tucked away on a grimy kitchen shelf ever since it first came out, years ago, at which time i gave it a rather perfunctory once over. the recipes seemed too simple, maybe even bland. i hate bland. so there it sat, unopened, unloved and forgotten until my mountain-man, brush-burning, shorts-wearing-all-year-round, house-building, firewood-chopping dad, whose culinary expertise (when i was a kid) ranged from plain, oven-baked chicken wings served with a side of unpeeled carrot sticks to something called "hungarian goulash", which was neither hungarian nor goulash, but a rather white-trash concoction of macaroni, hamburger and tomato sauce. what was i saying? oh yeah, this cookbook was largely ignored until my dads mentioned a recipe from this tome that he particularly likes. now, if there is one thing dads doesn't like, it's bland. he needs to be internally warmed by spice and garlic induced fires in order to wear those shorts in the dead of winter, i guess. i was skeptical but i glanced at the recipe (called chickpeas with tomatoes and potatoes, how unsexy is that?) and since i had all the ingredients on hand i decided to give it a try. the end result was utterly simple, clean tasting and delicious. it introduced me to one of my new favorite spices, corriander. i should mention that i, of course, increased the garlic and corriander.

since then i've made several recipes from the book and although some dishes have turned out a bit bland for me, the majority have been hits. it's really made me reconsider my "everything but the kitchen sink" approach to cooking.

following is deborah madison's recipe for hijiki seaweed with carrots and ginger. normally when i make this hijiki dish, i make it as my japanese moms taught me, using sugar and mirin, sliced shitake and aburrage (fried tofu puffs)...see what i mean by the kitchen sink? this preparation is simpler, not at all sweet (which is a nice change), and gets a real vibrancy from the sheer quantity of fresh ginger. it goes very well with brown rice cooked with shitake mushrooms and seaweed stock.

hijiki with carrots
2 cups dried hijiki
1-2 Tablespoons dark sesame oil
2 Tablespoons slivered ginger
3 carrots, julienned
soy sauce to taste
salt to taste
sesame seeds to garnish

in a bowl cover the dried hijiki with water and soak for about 15 minutes. drain and place in a saucepan, adding enough water to just cover and 2 Tablespoons soy sauce. simmer for 15 minutes or until soft and drain. heat a large skillet heat the sesame seed oil* and stir fry carrots and ginger for about 2 minutes. add seaweed and cook for an additional five minutes. add 1 Tablespoon soy sauce and remove from heat. adjust salt and soysauce to taste. sprinkle with sesame seeds and serve.
*if you're trying to watch your fat intake, you can also "steam fry" dishes using a splash of water instead of oil, adding just enough from time to time to prevent burning. after removing from heat you can add a few drops of sesame seed oil for flavor.

Wednesday, February 01, 2006

homemade bagels


i'd never really cared much for bagels. they'd always seemed, oh, uninspired. bready. airy. dull. like lunkering tires of dense wonderbread. oh, i would eat them without complaint once they were toasted crisp like an ibiza-vacationing-technoraving- christina aguillera-wannabe-lookalike-euro-tramp, and slathered with a hearty coating of hummus, tomato and dill pickle(!), but i'd never sought them out.

then one day on a whim i made a batch at home. i was afraid at first. the thought of putting dough into boiling water seemed like a recipe for disaster but, much to my amazement, the little tires puffed up and an exploratory post-boiling, pre-baking cut into one showed that the interior had already mostly cooked. the end product wasn't like any bagel i'd had before. they were dense. they were chewy. they were interesting. i didn't even have to toast them and slather them with toppings!

i'm not from the east coast nor have i spent any significant amount of time there, but i'm told that these are what real ny bagels are like. they're not particularly difficult to make and shaping them is a breeze if you ignore all the bad advice about making a coil and attaching the ends to each other to form a donut (i guarantee it will come apart in the boiling process)...just stick your finger in the middle and dig around until you have a hole to your liking.

Bagels
1 cup warm water
1 Tablespoon sugar
1 ½ teaspoon yeast
1 ½ teaspoon salt
3 cups flour

place yeast in warm and sugar and allow to froth. add flour and salt and knead until smooth and shiny. depending on your type of flour and altitude, you may have to add a little more or less water. let rest at least 20 minutes so the dough can relax. separate into eight equal sized balls and make into bagel shape by punching a hole in the center of each roll with a finger or chopstick and stretching the hole out (with your finger) until it is at least 1 inch in diameter (the hole will get smaller once the bagels puff up). place on a well greased (or floured) cookie sheet and let rest another 20 minutes. at this point you should bring to boil at least 4 inches of water in a large pot with 2 T. sugar. after the 20 minute rest, place the bagels in rapidly boiling water for 30 seconds to 1 minute on each side. the heat of the water is very important since this is what will make the dough puff up and get chewy. place a lid on the pot once the bagels are in to maintain a high temperature. drain and place on well greased, light colored cookie sheet and sprinkle with the toppings of your choice (i like salt, dried garlic bits, sesame seeds and fresh black pepper) or leave them plain. bake at 450 for about 15-20 minutes, turning over once. for wheat bagels, omit 1 T. sugar and replace with 2-3 T honey. replace all white flour with wheat flour.
Site Meter

«#Veggie Blogs?»